The Penn State Extension Philadelphia Master Gardeners present a contributory compendium
of gardening resources, ideas, information
to share, events and travels.
Walking through my Northwest Philly neighborhood on the way to work this morning, I noticed two things: air brisk enough to make me look like Puff the Magic Dragon and tons of forlorn green or semi-ripe tomatoes, hanging sadly from their cages and trellises.
In green, green Germantown, it seemed like nearly every block had a bushel of the unharvested fruit awaiting the final cold snap—one that looks likely to come this week as temps dip below freezing. Once the tomatoes freeze and thaw, all those burst cells inside will leave the meat mushy and unappealing.
But if you have a bunch of green tomatoes in the backyard because you (like me) couldn’t bring yourself to rip out this year’s bushes, this is your last shot to turn them into something wonderful: GREEN TOMATO JAM!
As autumn begins, it is the perfect time to try your hand at saving seeds! Many plants are almost ready to put their seeds out, or already have. In this post, we’ll go over some of the basics of seed saving from pods. Feel free to experiment and have fun!
Pods are protective layers that can hold a great array in size and number of seeds, and can come in a variety of sizes and shapes. The important thing to remember about pods is to allow them to mature on the plant. A dry, brown pod is a ready pod! In many cases, the pod may split, exposing the seeds. This is when you know they are ready to be harvested. If you harvest them too soon, the seeds may not be viable.
If you are worried that seeds will fall out of the pods before you are ready to harvest them, a tried-and-true strategy for collection is bagging the immature pods. Lightly secure a small bag or piece of cloth fully around the pod. Be sure that the material you use allows air and light to reach the pods, and that you secure the material firmly enough that it will not blow off, but not so tight as to damage the plant. The bag will catch any seeds as the pods burst open, with the added benefit of critters not being able to get to the seeds before you do.
You can see in this photo that the milkweed pod is still green. The seeds will not be ready for saving yet. Thanks to Delco Master Gardener Christine Coulter for the milkweed pods!
This milkweed pod is bursting and is perfect for saving!
These cleome pods are still green. They need some more time.
This photo shows a sense of the progression of a cleome pod from green to completely dried out. You can see a bag would have been helpful in capturing these seeds!
One of the nice things about saving seeds in pods is that they are typically already dried out and ready for storage. To be certain no moisture remains on the seeds, you can spread them out on a paper towel for a few days. Some seeds, such as the milkweed, may have other elements (like fluff) attached to the seed which should be removed prior to storage.
When your seeds are dry, store them in a paper envelope (plastic or glass is OK if you are certain there is no moisture left in the seeds). If you plan on sowing the seeds next spring, you can store them in the refrigerator as a cold stratification method to imitate the winter temperature and assist in germination. If you choose to store your seeds outside of the refrigerator, make sure the location is cool, dry, dark, and out of reach of pests.
These cleome pods are dry and ready for seeds to be saved. The paper towel helps remove any remaining moisture from the seeds prior to storage.
Remember to label your seeds! Come spring, it may be difficult to remember which seed packet contains which plant seeds.
A quick word to seed swappers and sellers: be careful about saving seeds from plants that are patented. Some plant varieties are patented by their creators, and in many cases it is illegal to save seeds from these plants. If you are not sure, check your variety online prior to saving seeds, or do not share your seeds with others.
Have fun saving! You can find more fall seed-saving tips from the Penn State Extension Philadelphia Master Gardenershere.
Living in an urban area, space comes at a premium to many of us. Now that it is fall and we take stock of how our gardens and plants fared this year, I want to share some ideas with you on ways to soak up every last inch of growing space for next year’s garden so you can plan ahead.
I encourage you to find new, plant-growing uses for old items. Did your watering can spring a leak this summer? No problem; it will be your new cutest planter!
No yard? Go vertical. An old pallet becomes a planter wall to frame your favorite outdoor plants.
Earlier this year, I asked our fellow gardeners at the Philly Plant Exchange Facebook group to send in photos of their best space-saving ideas. With their permission, I am sharing their photos and ideas in this post.
Loren Taylor also used vertical pallet planters, creating a beautiful privacy wall in the process.
Arly Chulmans shared photos of her vertical gardening techniques. Old shoe organizers become perfect plant pockets.
Cinder blocks are creatively stacked to create lot of vertical space in a narrow horizontal space.
Rebecca Hamell showed that sometimes space saving is about minimizing tools. By burying an irrigation system, Rebecca eliminates the need for hose containment or a bulky sprinkler system that sprays beyond the wanted range.
Using trellises to support tomatoes and other large plants takes less space than traditional tomato cages and plant supports.
Melissa Mazur also uses a combination of trellises and raised beds to make the most of a narrow space.
Dominic Ariaudo makes the most of his outdoor staircase, hanging plants from the bannisters and steps, and using it to provide partial shade for his container plants.
Siri Mai packs a huge amount in her 5’x10’ balcony with plant shelves, balcony boxes, and hanging baskets.
And finally, Tresa Copes followed the tried-and-true strategy of fitting as many pots and planters in her space as possible!
Hopefully some of these ideas have inspired you to take next year’s garden to the next level. Happy planning!
As summer winds down and early onset nostalgia for this year’s tomatoes hits hard, it’s time to think about saving seeds for next year. Saving seeds is easy and it has many benefits.
The most obvious is that it saves you money – you won’t have to buy seeds or transplants for your favorite vegetables next year. It also helps maintain a genetic diversity. Go into any heirloom seed catalogue and you’ll see hundreds of varieties of vegetables you may have never heard of. Many of these varieties have relied on gardeners preserving the seeds and planting them through the years. In addition, it helps build a community through sharing seeds of vegetables that do well in particular regions. Finally, it connects you with your garden beyond eating the food it provides. Careful attention to the seeds you save and the plants you grow in following years opens up a whole new level of understanding how your plants interact with each other.
Plants produce seeds when their flower is pollinated. This can either happen through self-pollination or cross pollination. When a plant self-pollinates, no new genetic material is introduced and so the next generation of plants are similar to the parent plants. In cross pollination two varieties of the same species of plant are crossed and the future generations have a combination of characteristics from the parent plants. Ensuring your plants do not cross pollinate is important if you are trying to grow a specific heirloom variety. However, cross pollinated plants are great to maintain a genetic diversity and find new varieties. Depending on the reason for saving seeds, the process actually starts when you plan your garden.
PLANNING YOUR GARDEN TO SAVE SEEDS
If you want to plant delicious heirloom varieties year after year and preserve their genetic line, you’ll need to prevent cross pollinating with other varieties. You can do this in a few ways. The first is to consider what varieties you plant and create distance between them so that they do not cross pollinate. Depending on the plant, a distance of 100 feet to 1 mile could be required. In many cases this is feasible; however, if you have a small garden and want variety, there are still a few other methods. You could plant just one variety per species so that even a cross pollination would result in the same heirloom characteristics. Alternatively, bagging the flowers will create a barrier so that they won’t be pollinated by insects or the wind. To do this, put a paper or fine mesh bag over the flowers before they open. If the flowers are perfect – containing both male and female parts, like a tomato – they’ll self-pollinate in the bag. If the flowers are male or female, like a pumpkin, they’ll require you to pollinate them when they open and then re-bag them.
If all of this seems like too much work and you want to be a bit adventurous and see what nature will create, you can just let your plants do what they’ll do. Maybe you’ll get lucky and they’ll self-pollinate; maybe you’ll end up with a delicious never-been-tried crossed variety; maybe the result will be inedible. The point is – if you are just starting seed saving and didn’t go through the meticulous process of avoiding cross pollination – you can still participate in seed saving.
A little note on hybrids. Hybrid vegetables are sold at nurseries and are wonderful. However, the seeds they contain don’t match the vegetables you are eating this year. They might, but like any cross-pollinated plant, they might not. In fact, the seeds may not even be viable. But, while the best seeds are “open pollinator” varieties, I would never discourage anyone from garden experiments – including saving seeds from hybrid plants.
ON TO THE SAVINGS!
Now that you’ve decided to save seeds you’ll need to know when to harvest, what to harvest, how to harvest and finally how to store them until next year.
Harvesting seeds often does not happen at the same time you harvest plants to eat. Vegetables that reach their market maturity, the time when we like to eat them, are often still immature with undeveloped seeds. Beans need to be dried longer on the vine, cucumbers need to stay out until they’re a little wrinkly and eggplants need to wait until they turn a yellow/green color. Because of this, you’ll want to designate some of your vegetables to be seed savers rather than dinner.
Choosing what seeds you’re going to save is key. You want to choose a vegetable that is ideal in size, color, and from a plant that’s free of disease. These are the characteristics you’re passing on, so you want them to be the best!
Image courtesy of the author.
Once you’ve chosen the vegetables you want to save seeds from and waited until they’ve reached seed maturity, you’re ready to harvest the seeds. To do that you’ll either wet harvest or dry harvest. Vegetables with pulpy flesh – tomatoes, cucumbers, eggplant, etc. – are wet harvested, while beans, basil, lettuce, etc. are dry harvested.
HARVESTING - DRY METHOD
Dry harvesting is fairly easy. You’ll want to let the seeds dry as long as possible on the plant. For example, a bean pod will be yellow, dry and nearly crumbly with hard seeds when it’s ready to be harvested. You don’t want to wait too long as eventually the seed pods will open up and scatter your beans in the garden (not necessarily a bad way to go for a lazy gardener). Once you’ve removed the seeds from the plant you need to further dry them by placing them in a single layer on a screen or paper towel in a well-ventilated area for a few days. Blow off any remaining seed pod, chaff or debris.
If the seeds are small – like from dill or basil – you can take the whole seed head and put it in a paper bag. Once they are all dry give the bag a shake until all the seeds are off the seed head. Again, blow off any chaff or debris and you’re done.
Image courtesy of the author.
HARVESTING - WET METHOD
For plants with a pulpy flesh there are a few more steps. Once the vegetable has reached seed maturity – again, slightly after you’d want to eat it – remove it from the plant. Slice it open and scoop out the seeds. For tomatoes it’s really easy to crush and squeeze the pulp and seeds out. Put the mass of pulp and seeds in a jar or bucket and add a bit of warm water. These seeds require or benefit from a bit of fermentation. You simply need to stir the mixture once a day for three or four days. As the seeds ferment, the good ones will fall to the bottom leaving the unviable seeds and pulp at the top. Pour this off and save the sunken seeds. You can spread them on a fine screen or paper towel to dry.
STORING SEEDS
Seeds need to be in a cool, dry place to last through the winter until the ground is ready to be planted next year. This can be in glass jars or paper envelopes, in a cool basement or the fridge. You can even freeze them – however this requires even more drying. If you’ve dried seeds on a paper towel and they’ve become stuck, you can fold them up in the paper towel and store them that way. Once you’re ready to plant them, rip the towel with the seeds and plant the whole thing – this will prevent the seeds from being damaged as you try to separate them from the paper fibers. Finally – label, label, label! Winter is long, and well-intentioned memories will fade.
http://www.reusableart.com/jars-of-herbs.html
SHARING!
Now you’re ready to start saving. Once you’ll do you’ll soon realize that saving seeds from even one cherry will give you way too many plants for next year. One of the most gratifying parts of saving seeds is being able to share with fellow gardeners. Starting a seed swap with your community is a great way to share the bounties of this year’s garden and to experiment with what your neighbors are planting!
I manage the vegetable garden at Pendle Hill, a half-acre space tucked into a corner of campus that produces fruits, vegetables, and culinary herbs for the kitchen. Pendle Hill’s campus is beautiful and wooded and, much to my chagrin, heavily populated with white-tailed deer. Last season they flocked to the garden like a free buffet, helping themselves to Swiss chard and my young tomato plants. This winter, in addition to making plans for a deer fence, I’ve also come across several deer-deterrent strategies. The one that I’m most excited about is the use of perennial onions.
Why? Well, it turns out that deer cannot stand the smell of plants in the Allium genus, which includes onions. This year I’ve chosen to focus my attention on perennial onions for a few reasons. First, annual onions require a great deal of time and attention to grow; perennial varieties, on the other hand, require much less labor and maintenance once established, and will continue to produce for years. Perennial onions actually used to be much more widely cultivated than they are now, but fell out of favor with the advent of mechanical harvesting (perennial onions tend to grow in patches, whereas annual onions can be grow in uniform rows). Perennial onions also have a variety of flowers and flavors, adding forage for pollinators and flavors to your kitchen.
In my research I came across a variety of different perennial onions. The following is a selection of my favorites. Enjoy! And may your garden flourish.
Allium fistulosum (Welsh Onion)
Sometimes called bunching onion, scallion, or spring onion, Allium fistulosum will be a welcome addition to my garden this year. (I’ll be planting ‘White Spear,’ a heat-tolerant cultivar, and ‘Evergreen Hardy White,’ a cold-hardy cultivar to see which does best.)
Robert Pavlis, http://www.gardenfundamentals.com/allium-fistulosum/
Welsh onions have hollow, edible leaves and produce scapes. Large varieties resemble leeks, while smaller varieties look more like chives. They are similar in taste to the common onion (Allium cepa). The flowers of Allium fistulosum come in a variety of colors, and some are used as ornamentals. They form perennial, evergreen clumps, and can be propagated by division. They can also be started from seed in the early spring for transplant outdoors. They typically need about 7-10 days for germination, and about a month to reach transplant size.
Originally from China, Welsh onions have been naturalized across Eurasia and North America. They are often used in East and Southeast Asian cuisine. Miso soup in Japan often contains Allium fistulosum. My Welsh onions are doing well! I’ve got a nice patch started in my herb bed, and am excited to see how they’ll look next season.
A favorite amongst foragers and foodies, ramps (also known as spring onion, ramson, wild leek, wood leek, and wild garlic) have been dangerously overharvested in recent years. In Quebec, people are limited to harvesting 50 plants per year, and restaurants are forbidden to use them. The good news is that, if you have the right conditions in or around your garden, it is possible to start your own patch of ramps.
Ramps are a bulb-forming perennial; they spread clonally by division, and grow in close groups just below the soil. The whole plant is edible and has a flavor that’s a combination of onion and strong garlic. One of the earliest spring vegetables, ramps were used as a spring tonic and culinary herb by Native American tribes including the Iroquois, Potawatomi, and Ojibwa. They provide much needed vitamins and minerals after long winter months. New leaves emerge in March and April, and die back in June as the flower stalk emerges. Seeds develop in late summer.
Ramps like growing under forest canopies, especially canopies composed of beech, birch, sugar maple, and/or poplar. They’ll also grow under buckeyes, lindens, hickories, and oaks. They like well-drained soil high in organic matter and leaf mold. If you don’t have a wooded area nearby, you can build a shade structure for your ramps. Ramps can be grown from seed, though it will take some time for a patch to grow in this way as seeds could take years to germinate based on conditions. Direct seed in the spring or fall. If it’s possible to find seedlings, transplant out in March and April. Allow your ramps a few years to establish themselves into a patch, and then harvest by thinning in order to assure a lasting supply.
Allium tuberosum (Garlic Chives)
Native to southwestern parts of the Chinese province of Shanxi, garlic chives have been cultivated around the world.
Garlic chives grow from a small, elongated bulb that originates from a stout rhizome beneath the soil. Its leaves are flat, and somewhat fleshy, tasting more like garlic than chives. In the late summer/early fall, it produces white flowers on umbels on stalks 10-24 inches in height. These flowers are quite beautiful, and attract butterflies.
In warmer areas, the garlic chive is evergreen. In colder areas (zone 7 and below) it dies back to the ground in the winter and resprouts from rhizomes in the spring. It grows in slowly expanding, perennial clumps, and will also sprout from seed. It’s worthwhile to note that in some states garlic chives are considered a noxious weed (in Arkansas, for example), and will require some work to keep it within a certain space. Deadhead flowers before they set seed in order to control spread.
Garlic chives can be grown in average, dry to medium, well-drained soil in part shade or full sun. Direct seeding is preferable – sow seeds ¼” deep when the soil warms in the spring. Seeds can also be started 6-8 weeks before transplant indoors.
Allium proliferum (Egyptian Walking Onions)
Egyptian Walking Onions are one of my favorite plants. I have a small patch started in the garden, and I’m hopeful they’ll spread. Allium proliferum have long, hollow leaves like Welsh Onions. Rather than producing flowers, however, they produce a cluster of bulblets. When the cluster gets heavy enough, the stalk falls over, and the bulblets sprout up from the soil, and so the onion “walks.”
A hybrid of Allium fistulosum (Welsh Onions) and Allium cepa (the common onion), it’s postulated that this onion was brought to Europe from the Indian subcontinent by the Romani people. The entire plant is edible, from the shallot-like bulbs to the leaves and stalks. The bulbs are tougher and more pungent than the rest of the plant. Young plants can be used much like scallions in the spring. Most cultivars are quite strong-flavored, but there are more mild and sweet cultivars available as well. While Egyptian Walking Onions can grow in tropical conditions, they are also quite winter hardy.
Walking Onions prefer full sun, and slightly moist but well-draining soil. Topsets (the clusters of bulblets produced by the plant, also called ‘bulbils’) can be planted any time of the year, though fall is the optimal time to plant. Plant each topset in soil about two inches deep with one foot spacing in rows two feet apart. Plants will most likely not produce a topset until their second year after planting.
Allium cepa var. aggregatum (Potato Onions, Shallots)
I haven’t grown either of these before, but I’m excited to try! Potato onions and shallots are closely related enough that they are considered to be the same species and variety. The exact line between the two is hard to pinpoint, but potato onions are said to be larger, divide into fewer bulbs, store longer, and have a stronger flavor than shallots. They are comparable in flavor to common onions, and can be used as a substitute in recipes that call for them. Potato onions are also known as multiplier onions, pregnant onions, or mother onions.
Potato onion plants produce a cluster of bulbs attached at the base each year. To keep a patch going, you can harvest the larger bulbs while leaving the smaller ones behind to produce more bulbs the following year. Some people harvest all of their onions and replant the smallest ones the following year just like potatoes (hence the name). Potato onions are smaller than common onions, typically between 1 and 3 inches in diameter, and store very well once cured.
Potato onions are quite winter hardy, surviving up to USDA zone 4. They require long summer days, and so typically do best above latitude 37 (in Philadelphia, we’re at latitude 38, so we’re good!). Potato onions are typically propagated via division. Bulbs are planted in the spring or fall, just below the soil in the fall to give them a bit of protection during the winter, and about one half to two-thirds of the way down into the ground in the spring. Potato onions typically grow mostly out of the ground. They can also be grown from seed, though this route is more difficult. Start seeds indoors about 2 months before the last frost, scattering them and pressing them lightly into the surface of the soil. They require strong light. Germination can take as long as three weeks, and germination rates are around 60%. Plants can be transplanted once they reach about 3 inches in height.
Potato onions are heavy feeders, so they do well with a nitrogen boost in the spring. They don’t put up well with weeds either and thus also require weeding.
Shallot classification, it turns out, is a bit tricky. Most shallots are the same variety as potato onions – Allium cepa var. aggregatum – but were previously classified as Allium ascalonicum. The French gray shallot (or griselle), however, is actually a different species: Allium oschaninii; as is the Persian shallot, which refers to three species: Allium stipitatum,Allium altissimum, and Allium hirtifolium. The former is often referred to as the “true” shallot, and grows wild from central to southwest Asia. The latter is also native to central and southwestern Asia, grows on rocky slopes and in fields, and is often harvested in the wild. It has large flowers on tall slender stalks and as a result is often used as an ornamental.
For the sake of simplicity, I’ll primarily be talking about Allium cepa var. agreggatum.
Originally from central/southwest Asia, shallots can range in skin color from golden brown to gray and rose red, while their flesh is typically off-white and tinged with green or magenta. Like garlic, they’re formed in clusters of offsets with a head composed of multiple cloves. As you probably know, they are widely cultivated and treasured for culinary use. They have a milder flavor than common onions, and can often be substituted for them in recipes. Finely sliced and deep-fried shallots are often used as a condiment in Asian cuisine. They can also be pickled.
Shallots get their name from the ancient Canaanite city of Ashkelon; people in classical Greek times believed that shallots originated from there.
While you can start shallots from seed, most are propagated via offsets. Much like garlic, they can be planted in the fall (zones 3-10) or spring, 4 to 6 inches apart with the pointed end facing up just below the soil surface. They prefer rich, loose soil, with a slightly acidic pH of around 6-6.8, though they will grow in more neutral soil. During the growing season, they need plenty of water. Green tops can be cut and used like chives as long as you’re careful to leave enough leaves to nurture the bulb. Flower stalks should be cut to in order to redirect energy towards the bulbs. Left in the ground, they’ll resprout the following season.
Allium schoenoprasum (Chives)
Chives grow wild across much of Europe, Asia, and North America. They’re commonly used as a culinary herb – all parts of the plant, including the flowers, are edible. They grow to be around 12-30 inches tall, and have small, slender, conical bulbs that grow in dense clusters. Stems and leaves are hollow and tubular, distinguishing them from garlic chives which, as we saw earlier, have flat leaves.
They are also used in gardens as pest-control – they produce sulfur compounds, which repulse many insects. At the same time, they are also great pollinator plants, producing large amounts of nectar. In a UK survey conducted by the AgriLand project, they were ranked in the top 10 for nectar production.
Grown from seed, plants will mature in the summer or early the following spring. They can also be propagated via division. In colder regions, chives die back to the ground in the wintertime, with new leaves sprouting from the bulbs in early spring. They thrive in well-drained soil high in organic matter with a pH of 6-7 and full sun. When harvesting, make sure to cut stalks down to the base. Continuously harvesting plants during the season will help to keep stalks tender for cooking.
I could go on – Allium is a large genus, comprised of hundreds of species, all of which, according to Peterson’s Field Guide, are edible. I’m sure there are plenty more perennial onions to explore!
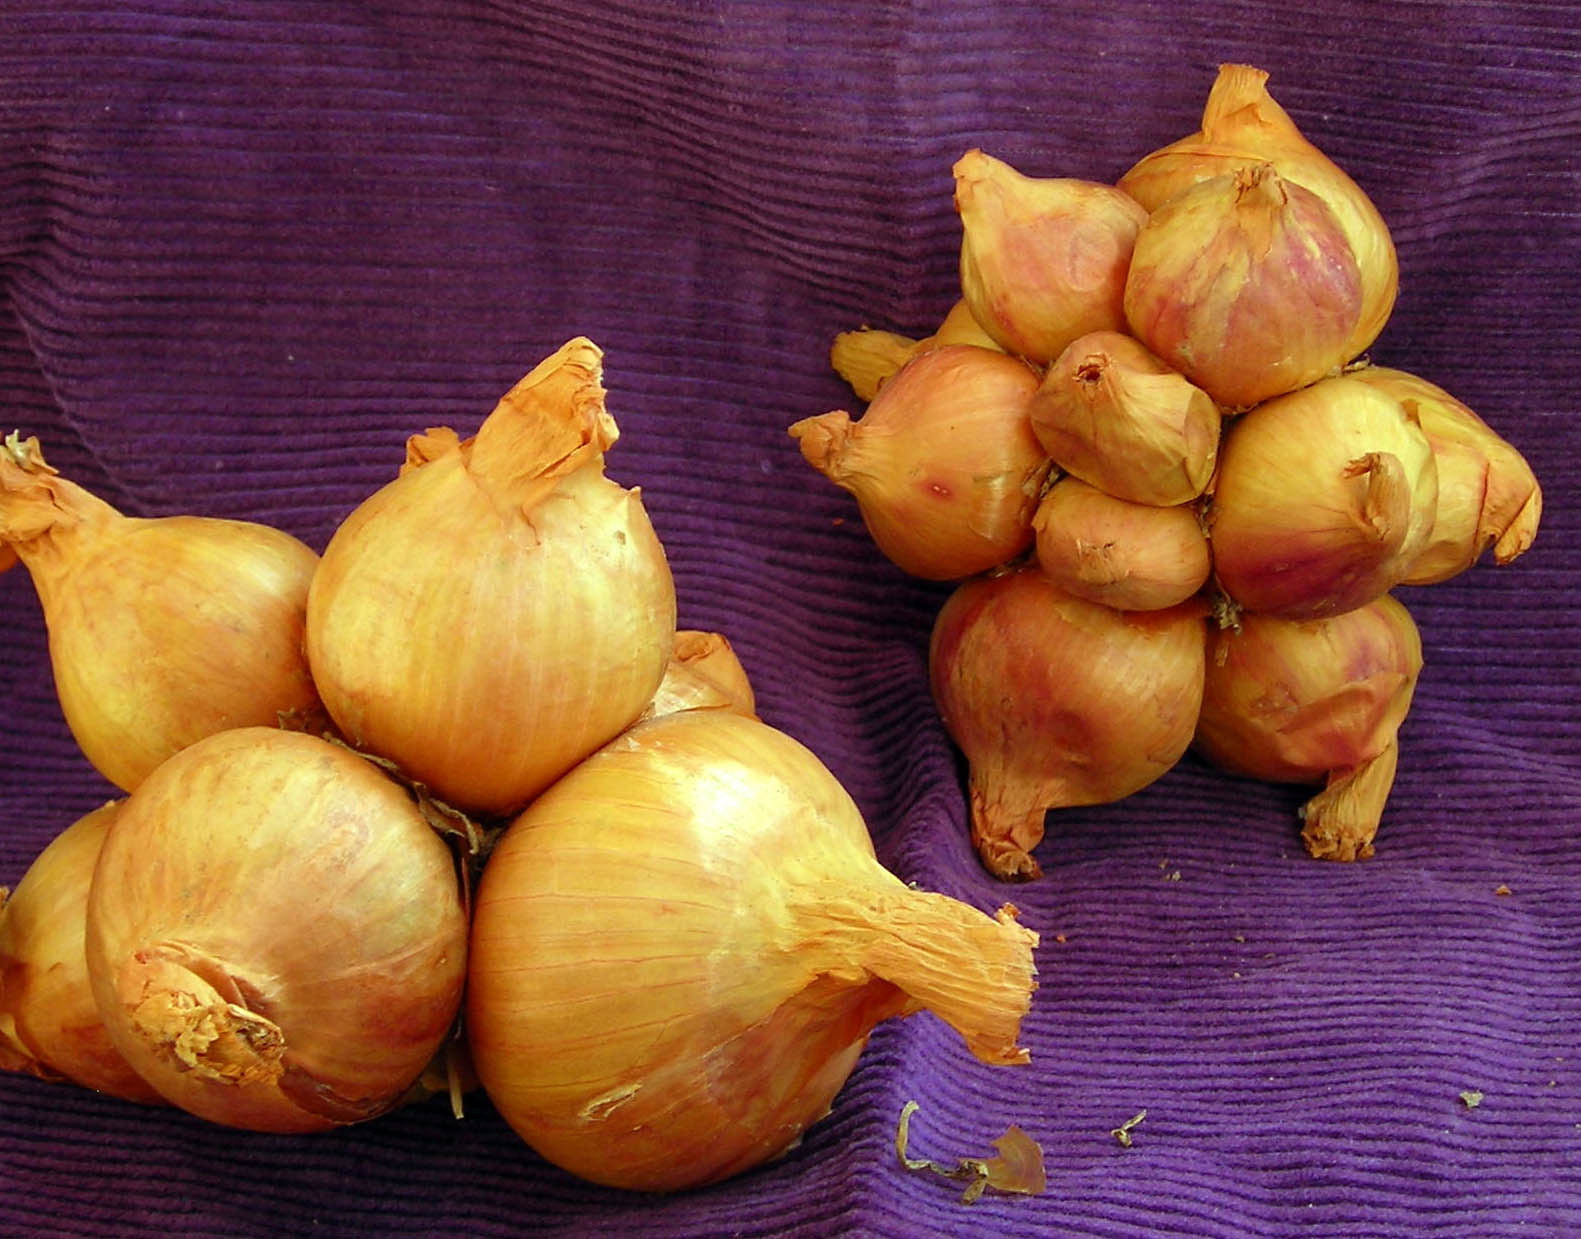
Shannon Pacilli As summer wanes, the time comes to pay some attention to those garlic cloves we planted last fall. The garlic shown in this video was planted November 15, 2017 and harvested on August 6, 2018.
Since garlic is a cool weather crop, growth halts when the soil temperature reaches 80-90 degrees. The tops of your garlic will begin to turn brown and die back, indicating it’s time for harvest. If you’re growing a scape producing variety, this will happen approximately 3 weeks after you see the scape. If you’re not sure that your garlic is ready, test one bulb by digging it up and looking for the differentiation of individual cloves. To get a good wrapper layer, it’s best to harvest the garlic when 3-4 leaves are still partially green.
If harvested early when individual cloves have not yet differentiated, or if left in the ground too long so that cloves have burst out of their wrapper (likely not storable), not to worry. Bulbs harvested a bit early can be eaten as “Spring garlic.” These have a delectably fresh and delicate garlic flavor. Those harvested a little late are still delicious but must be used quickly, as they will not store long.
It is important to avoid damage to the garlic bulb when harvesting. Use a garden fork or shovel to dig straight down a few inches away from the bulb and lift. If growing a hardneck variety, you can gently pull the stem after loosening up surrounding soil. Do not pull the stem of softneck varieties. This may cause breaks or tears in the neck, making them more vulnerable to spoilage organisms. After cloves have been lifted from the ground, remove the excess soil but do not wash them.
Cure garlic for at least 4 weeks in a warm, dark, well-ventilated place. Bulbs can be hung to dry or laid out on a screen. Test dryness by rolling the neck between your fingers. If the neck goes flat and does not roll, bulbs are dry enough. To store, trim roots closely and clip stems, leaving ¼ to ½ inch intact.
Ideally, garlic will keep for up to 6-8 months. It stores best below 40 degrees and above 60 degrees. Storing garlic at temperatures between 40 degrees and 56 degrees encourages premature sprouting. Make sure to check on stored garlic from time to time. Anything going soft or beginning to sprout should be used as soon as possible.
The time for sowing seed garlic is fast approaching, so don’t forget to save your biggest and best cloves for next year’s crop. If you need a refresher, check out 4 Easy Steps for Homegrown Garlic.
I went to the Grow West 2018 Master Gardener State Conference the last weekend in June with a fellow Philadelphia County Master Gardener (MG), Sally Gendler. I wish you all could have been there!
Six Southwestern Pennsylvania counties hosted the four day event at Seven Springs Mountain Resort in Seven Springs, PA. The event included tours of Pittsburgh city proper, private gardens, a tour of two Frank Lloyd Wright’s local masterpieces, lectures by PSU professors, gardening authors, and a speech by the founder of Master Gardening. There was also an expansive and competitive silent auction, a garden market with handmade birdhouses, tools and plants, as well as a make your own vertical garden workshop. Furthermore, the hotel which is a cross between the Poconos and a little Swiss Alps village had lots to offer too, from lovely, rustic seating overlooking summer greenery and activities to stores and a serious spa lovers hideout called Trillium Spa.
I always wanted to see Wright’s Falling Water and pairing a MG event to a visit to the iconic architect’s masterpieces was just the ticket to get me to go. The 4 hour drive from Philly was filled with lovely scenery, rolling hills and dairy farmland everywhere.
The first morning, as I left my room for the Wright houses pre-conference tour, I walked past someone who looked familiar, Angela Weathers from Franklin County MG. We turned to each each other, laughed, and spent the day together on the tour. We had a two-hour tour at Kentuck Knob and Falling Water and I’m so glad I met a friend to share the experience with. Falling Water is nothing less than a man-made wonder.
Leslie at Kentuck Knob
Though picturesque, nothing like it will ever be built again because Wright had such a unique style plus modern laws would never allow something like this to be built there. Just to keep Falling Water preserved is challenging as water is streaming everywhere around and it’s also in the middle of mountain woodlands filled with blooming laurels and rhododendron.
Frank Lloyd Wright's Falling Water
Following our tour, there was a cocktail social at the top of a ski lift. Unfortunately, the lift only stayed open for a ½ hour so we missed that trip but we sat on the seat later and had our picture taken anyway.
Sally and Leslie on Ski Lift
We met new gardener friends like Diane Diffenderfer, Wayne County Office Coordinator, and David Gibby, founder of the Master Gardener program, who was honored at the banquet. It meant so much to him to see hundreds of the master gardeners there. As Gibby received a standing ovation, he told stories of all the help he needed at the Washington State University Extension office and how he created this volunteer program.
During the whole conference homemade cookies were on plates everywhere to help keep our energy up through all the busy breakout sessions and speakers, as it is the local master gardeners’ hosting tradition. The first day right after breakfast we listened to “Container Savvy” gardening by Jessica Walker and learned about starting a home orchard, where I received “A Field Guide to Tree Fruit Disorders, Pests, and Beneficials” by Penn State Extension which was printed in both English and Spanish. Later, there was a pesticide education update talk followed by “Growing Native Plants from Seed” by Mark Tebbitt, native seed starting expert. Tebbitt described in detail the seven types of germination codes and his potting method.
Conference attendees gathering between sessions
The second day at breakfast we heard Brie Arthur, author of Foodscapes, who was so inspiring and such a avid gardener! I learned that Arthur’s mentor was Roseland Creasy who coined the term “edible landscapes”. Questions were raised like “Why do we separate our flower and vegetable gardens and who says we have to?” It would make suburban landscaping so much more relevant and meaningful as foodscaping adds to the health and complexity to the home garden. I think it’s a wonderful idea!
After Arthur’s talk, I traveled back home with lots of silent auction goodies that Sally so kindly collected for me at the end of the conference. I highly recommend these conferences as a chance for continuing education credits and an opportunity to see the beautiful and unique state of Pennsylvania!


